5 Easy Holiday Craft Ideas For The Kids!
With the holidays in full swing, it can be a stressful time for parents. Between battling out in store aisles for this year’s must-have toys (I hope everyone’s stocked up on Hatchimals), frantically remembering to rearrange the Elf on the Shelf, and trying to keep the kids entertained as they anxiously await Santa’s arrival, you might be feeling more like the Grinch than you’d like to admit. In an effort to restore some holiday cheer and keep the little ones entertained, we’ve compiled a list of five easy DIY holiday craft ideas.
1.Jolly Elves

This fun and simple craft might give your Elf on the Shelf a run for his or her money!
What You’ll Need:
– One whole chenille stem and half a stem
– Small and large beads
– Wooden face bead
– Small jingle bell
– Felt
– Glue gun and hotmelt adhesive
– Scissors
– Ribbon
How to Make Them:
Hat: Cut a 1-1/2-inch-diameter semicircle from felt. Wrap the semicircle around from point to point to form a cone, leaving a small opening at the tip; hot-glue to secure.
Scarf: Cut a 1/2-x-4-inch piece of felt; fringe ends with scissors. Cut a small lengthwise slit about 1 3/4 inches from one end for opposite end of scarf to pass through.
Body: Bend one chenille stem in half and, in the following order, thread materials over the bent point to about halfway down the stem: large bead for body, face bead, felt hat, small jingle bell. Leave about 3/4 inch above the jingle bell and shape the stem into a loop. Then, starting on opposite ends: Thread 4 small beads onto each leg and bend the ends to form feet. Use the half chenille stem to make arms by centering and twisting around the elf’s neck area. Thread 4 small beads onto each arm and bend the ends to form hands. Wrap the scarf around the elf’s neck, then thread ribbon through the top loop and hang.
2. Snowflake and Felt Bird Ornaments

These ornaments are super easy and can probably be made using some spare items in your craft or junk drawer.
What You’ll Need:
– Popsicle sticks
– Buttons
– Craft glue
– Thread
– Scissors
– Felt
– Spring clothespin
How to Make the Snowflakes
Glue three Popsicle sticks together in an asterisk shape and let dry. Glue buttons along each stick, as shown. (Be sure to position a larger button at the end of one stick so that the button holes are not blocked.) Push thin thread through large button holes to hang.
How to Make the Felt Birds
Trace this bird template onto felt and cut out. Glue the wing to the body and decorate with sequins. Attach a clothespin to the back with glue.
3. Doggie Biscuits

For dog lovers, create some tasty gingerbread biscuits to spread the holiday cheer to your pampered pup. Your kids will love being able to create their own holiday treats for their best friend.
What You’ll Need:
– 3/4 cup hot water
– 1/4 cup butter
– 1/2 cup powdered milk
– 1 teaspoon salt
– 1 large egg
– 2 cups whole wheat flour
– 1 cup quick oats
– 1/4 cup wheat germ
How to Make Them:
1. Heat oven to 325 degrees F. Combine 3/4 cup hot water and 1/4 cup butter in a large bowl. Stir until butter melts. Add 1/2 cup powdered milk, 1 teaspoon salt, and 1 large egg, beaten. Stir in 2 cups whole wheat flour, 1 cup quick oats, and 1/4 cup wheat germ. Mix until dough forms. Knead on a floured surface to form a stiff dough.
2. Roll dough out to a 1/2-inch thickness and cut out dog-bone shapes using a cookie cutter. Place on baking sheet and bake 50 minutes. Let cool completely. Store in airtight containers. Makes about 2 1/2 dozen.
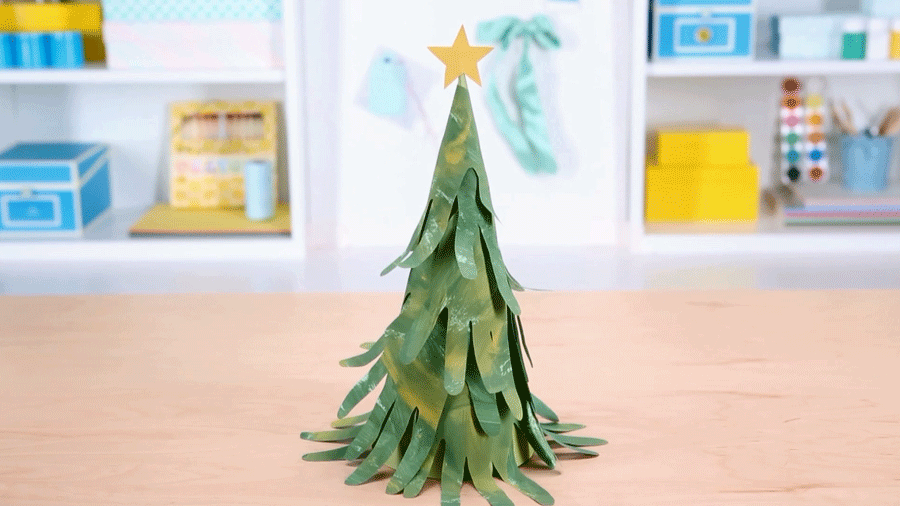
4. Handprint Tree

This easy craft ensures that you will have a unique Christmas tree with your child’s personal touch.
What You’ll Need:
– Office Paper
– Paintbrush
– Tape
– Scissor
– Toothpick
– Green and yellow card stock
– Green and light green paint
How To Make Them:
Paint several sheets of office paper green. Accent the sheets with the light green paint. Let sheets dry. Trace your child’s hands onto paper. Cut the handprints out. Form green cardstock into cone. Tape cone shut. Trim bottom, so it sits flat. Glue hand cutouts to cone, fingers facing down. Cut out a star from the yellow cardstock. Tape it to a toothpick and add it to the top of the tree.
5. Lightbulb Snowmen

This simple craft transforms a plain lightbulb into an adorable snowman.
What You’ll Need:
– A lightbulb
– A toilet paper tube
– White paint
– Any solid color paint
– Black marker
– Orange marker
– Small piece of fabric
– Glitter
– Wire
How To Make Them
Balance a lightbulb on a toilet-paper tube, and paint the glass part white. Paint the metal a solid color for the snowman’s hat, and add eyes, nose, mouth, and buttons with markers. Wrap a small piece of fabric around the lightbulb neck for the snowman’s scarf. Finish it off with some spray adhesive and a sprinkle of clear glitter. To hang, take a bit of wire and twist it around the hat.
Have Fun!
Have fun with your creations and tag Funderland on social media to share your finished products with us!
– Happy the Squirrel & Your Friends at Funderland
Special thanks to Parents for the craft ideas!

